192.168.0.1 is what is known as a private IP. It is the default Internet Protocol address that the manufacturer of your device has assigned to it, and the router uses it to build your home or office wireless network. 192.168.0.1 is the ground zero for communication between all devices – smartphones, tablets, laptops, printers, and even smart TVs and fridges that you connect to your Wi-Fi. When you open up a browser or an app and try to access an internet service, you do not send the request directly to the website in question. First, you connect to the 192.168.0.1 router’s Wi-Fi. The router assigns the device you are using an IP based on its default private address – for example 192.168.0.2, or 192.168.0.3. The router then uses the public IP address your Internet Service Provider (ISP) assigned to it to send the request for data packages to the website. It receives the requested information on the public IP address and then distributes it to the device you are using based on the private IP of your network. The system may sound complicated, but in reality, the process takes seconds. Thanks to 192.168.0.1, you can access your router’s settings and fine-tune your network as well.
Logging in at 192.168.0.1
To tinker with your router’s settings and optimize the way your network functions, you will need to make sure the device you are using is connected to the 192.168.0.1 router’s Wi-Fi. To be a hundred percent sure, you may even use an Ethernet cable if you will be using a laptop or a desktop PC for the task.
Open your favorite internet browser and type 192.168.0.1 in the address bar. Be sure not to type 192.168.o.1 which is a common misspelling of the real IP address. When you hit Enter, three things may happen:
- You find yourself in the user control panel of your 192.168.0.1 wireless router. In that case, you may proceed with adjusting the settings and personalizing your network.
- You are prompted to enter a username and password for the device. These are most commonly the default logins to be found on the label at the back of the device. If those don’t work, maybe your ISP has changed them when setting up the network. You may try calling them to find out more.
- You get an error message that the page cannot be opened. Check if you are connected to the right network and if you have typed 192.168.0.1 correctly. Maybe you might have to call your ISP to check if they changed the default private IP from 192.168.0.1 to something else.
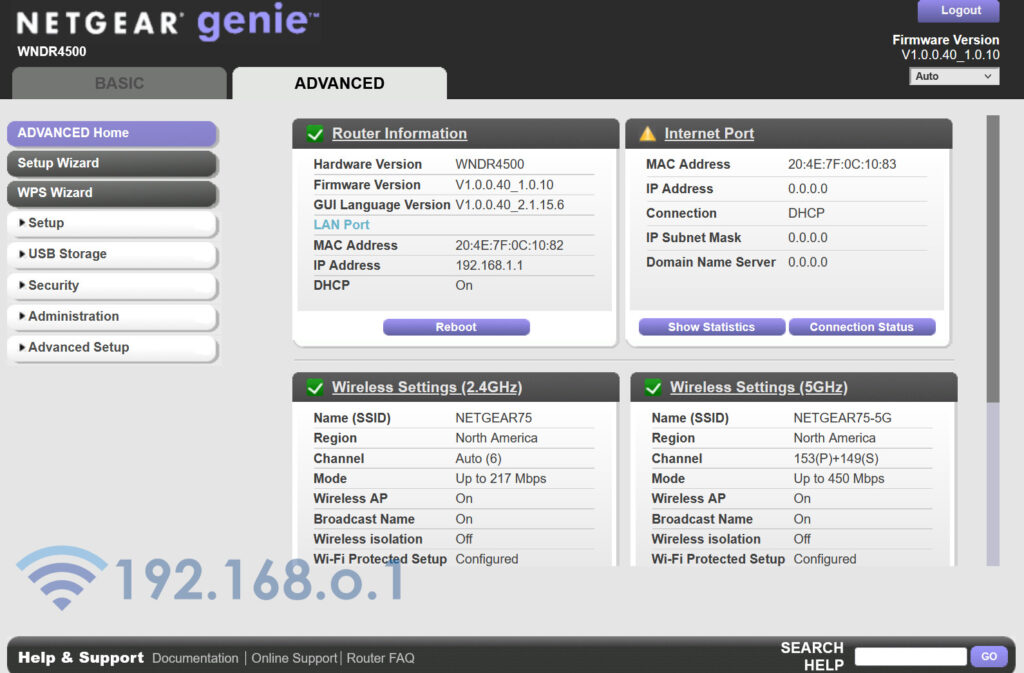
Once you are in the user interface for your router, you may proceed to the Wireless Settings tab. There you can choose a new name and password for your network. In the Network Settings option, you have the opportunity to change the default logins to a username and password of your liking. In that way, you will ensure only you have access to your wireless network’s settings at 192.168.0.1. You can even choose a new private IP for the router to add a layer of security to your network.
Wi-Fi routers that use 192.168.0.1
192.168.0.1 is a default private IP address manufacturers of wireless routers assign to most, if not all, devices they produce. The most popular brands and models that use 192.168.0.1 as a default private IP include D-Link COVR-22-A1, Linksys Wireless-G, and TP-Link Wi-Fi 6. Other models from these brands commonly use 192.168.0.1 as well.
Common Usernames and Passwords for 192.168.0.1 Wireless Routers
Just like using the same default private IP, many manufacturers assign the same username and password by default for all their devices. Here are the most common login combinations for 192.168.0.1 across the three most popular brands:
- TP-Link: username: admin, password: admin
- D-Link: username: admin, password: either admin or to be left blank
- Linksys: username: admin, password: admin
Note that in all cases the username and password fields are case-sensitive.
How to reset the admin password of a 192.168.0.1 router
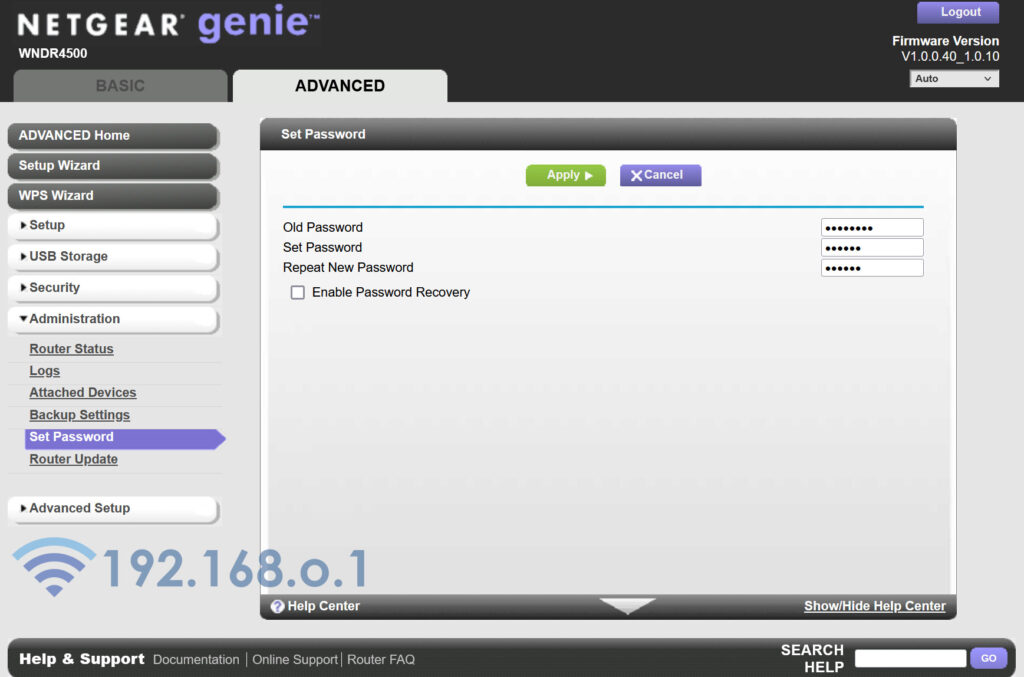
If you’d like to change the logins for your 192.168.0.1 settings menu, and you know the current username and password, just log into the settings menu. Go to Network Settings and find the Router Settings tab. There you will be able to choose new logins.
If you don’t know the current logins and you are unable to access the menu, you may have to carry out a factory reset of the device. To do that, make sure that your 192.168.0.1 router is switched on. Locate the reset button on the back. You may need a pin to press it. Press and hold the reset button until the lights on the front of the router start blinking. Keep pressing the reset button until the lights go dark and release the button once they get back on. When the router boots back up, it should be restored to factory settings and you will be able to access its settings menu at 192.168.0.1 using the default username and password.
What if the Wi-Fi password is wrong?
When connecting to the router’s Wi-Fi, you might get a “Wrong password” error. Check if you have input the password correctly. If the password is a combination of upper and lower-case letters, numbers, and symbols, it is easy to make a typo. If your password still doesn’t work, go to the 192.168.0.1 router settings menu and locate the section Wireless/Wi-Fi Settings. There you can choose a new password and name for your network. Input the new combination and save the changes. You can try logging back in to your Wi-Fi. Make sure to remember the new password combination and save it on your device. Otherwise, you might have to go through the reset process again.
Internet not working with a router with IP 192.168.0.1
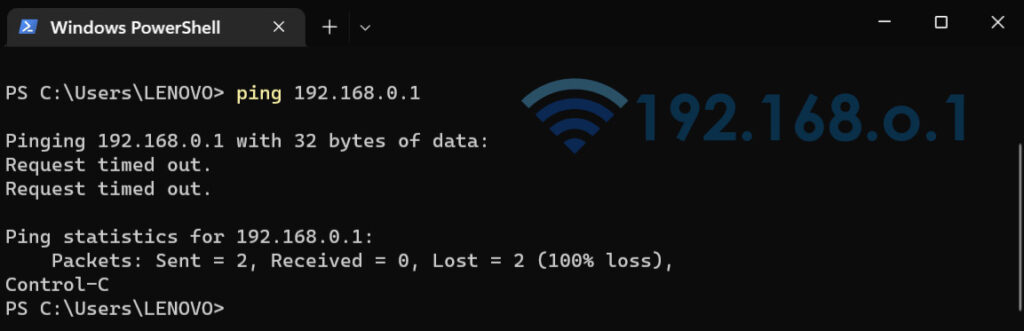
The first thing to do when your wireless is not working on a 192.168.0.1 is to try to Ping the router. Connect to the network and open the command prompt. Type ping and hit Enter. If you receive a message with a hostname 192.168.0.1 that means the router should be working properly. Try checking the connection with an Ethernet cable and see if that works. Finally, restart the router. Plug it off the grid and leave it for a couple of minutes. Boot it back up and check if the Wi-Fi is working. If it still doesn’t work, call your Internet Service Provider. Chances are that the problem is on their end.
How to Set Your DNS to 192.168.0.1
If you want to set your Domain Name System (DNS) to 192.168.0.1 on Mac:
- Go to the Apple menu
- Click on System preferences
- Go to Advanced
- Locate the DNS tab and click the + button.
- Enter 192.168.0.1 and save the changes.
To set 192.168.0.1 as your DNS on Windows:
- Open the Control Pane
- Locate the Network and Internet tab and open the Network and Sharing Centre in it.
- Go to Change Adapter settings
- Open the Networking tab
- Select the Advanced option and then the DNS tab
- Enter 192.168.0.1 as your DNS of choice
- Save the changes
If you want to set your DNS to 192.168.0.1 on Android:
- Open the Settings menu
- Then go to Network & Internet
- Click on Advanced
- Located the Private DNS tab
- Scroll to the Private DNS provider hostname
- Set 192.168.0.1 as your DNS and save the changes
To set your DNES to 192.168.0.1 on iOS:
- Go to Settings
- Tab on Wi-Fi to switch it on
- Choose the Wi-Fi network you are using and tab on the blue I Icon you see
- Locate the Configure DNS setting and select the Manual option.
- Tab on Add Server and type 192.168.0.1
- Save the changes and exit.
IP Conflict
In rare cases, you will get an IP conflict error message when using your Wi-Fi. That means two devices on the network use 192.168.0.1 as their private IP. In such a case both devices will be unable to use the internet connection. To resolve the issue, open the router settings, and in the Network settings menu enter 192.168.0.1 in the list of IPs excluded from the DHCP server.
Pinging 192.168.0.1 – Request timed out: